 Last month’s Synergy tips were so popular, this month we have even more tricks to share with you to maximize how you use this tool! Did you know that Hitlist Views can help you better organize your digital documents? Or that indexing can be made easier by using batch templates?
Synergy is a robust Enterprise Content Management (ECM) system that enables credit unions to securely capture, store, retrieve, and distribute electronic documents and reports. It acts as a repository to store most, if not all, of the information generated from daily credit union operations.
Read on for even more handy Synergy tips to help streamline your day!
Organizing Documents with Hitlist Views
Credit unions possess a lot of data—and documentation. While these documents are stored digitally, it can be cumbersome to organize and sift through large volumes of digital files. The Hitlist Views function provides the ability to better organize documents or reports with indexes like statements into tabs. This feature also allows you to set up filters to further reduce your query results without having to run multiple searches.

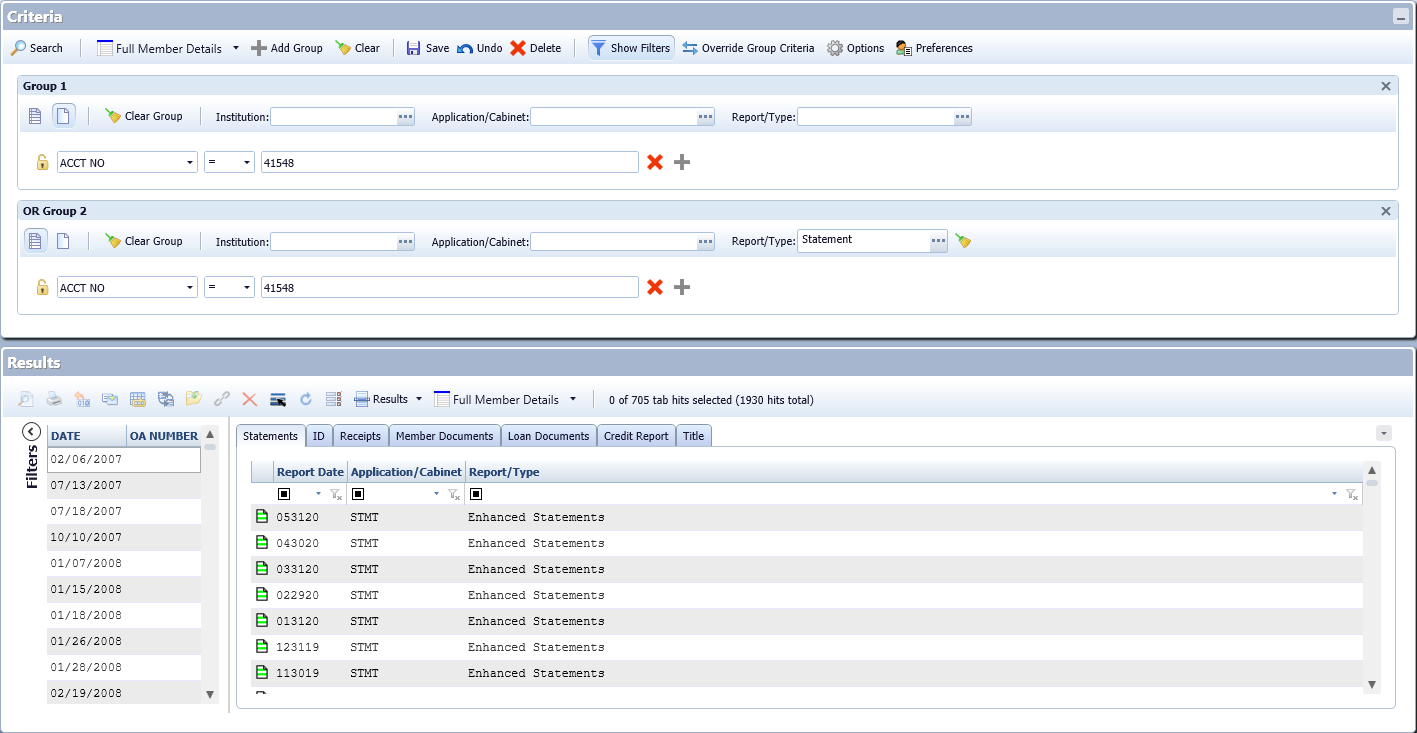
To get started on building Hitlist Views, you must have Hitlist View Maintenance authority in the User Group you are assigned to. No authority is required to use a Hitlist View, but it does have to be made available to you via its Category in your assigned User Group. Hitlist Views can be used with Quick Saves or with generic searches such as the example provided below:
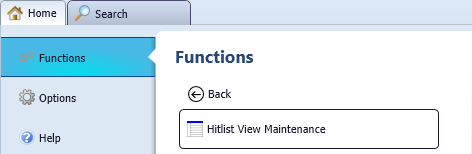
Hitlist Views can be created and managed by going to the Home Page. Click on Functions and then click on the Setup folder if it is available. If it is not available, then you do not have the authority to use the options like Hitlist View Maintenance within the setup folder.
Click Add to create a new General Hitlist View:
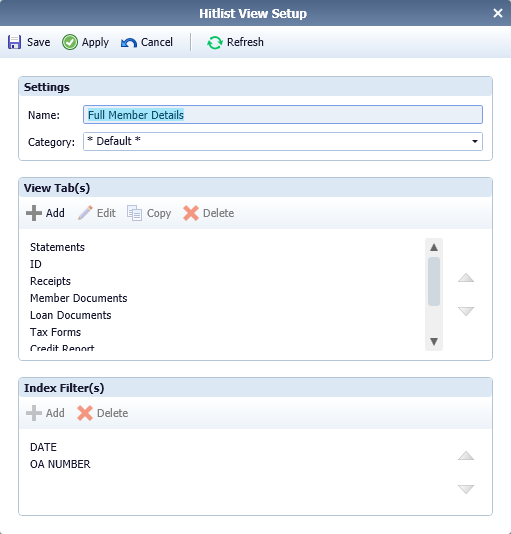
Enter a clear and concise Name so the end user understands the purpose of the Hitlist View.
Choose a Category that allows you to quickly make Hitlist Views available to End Users via User Group Assignments.
Create all the necessary Tabs that meets the needs of your end users. When adding these tabs, you will need to have a good understanding of your Cabinet and Doc Type structure. You may choose one Cabinet and all Doc Types or a subset of Doc Types. For instance, you may want a tab called Loan Package and with that you know you have 10 Doc Types that make up that Loan Package and those 10 Doc Types reside in the LOANS Cabinet. You would click Add in the Contents section, choose the LOANS cabinet, and then choose the 10 Doc Types that are part of your Loan Package.
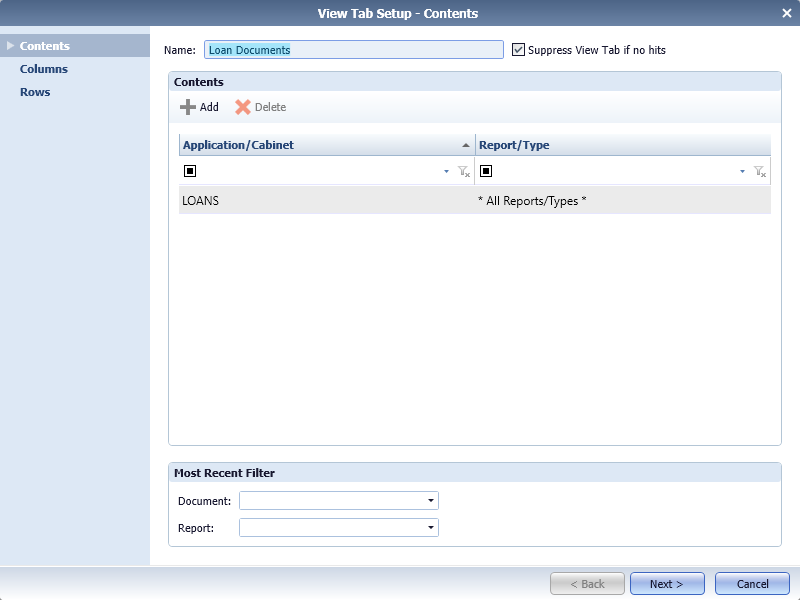
If there are no documents for the search you performed, and you don’t want the tab to display, then you can check the “Suppress View Tab if No Hits” checkbox. That way you know there are no documents for that tab, which saves you a click.
Click Next and you can choose all the indexes that you are interested in seeing. For instance, you have a tab that just shows Receipts, you don’t need to see the Cabinet or Doc Type because you already know the tab is for Receipts. This means you can just focus on the indexes associated with the Receipts, which prevents scrolling left to right to see all the pertinent information.
In addition, you can choose up to two indexes to filter on. For instance, if you know you want to search for all documents imported in the last seven days, you can set up a filter by ACCT NO and it will display all Account Numbers on the left-hand side of the Hitlist View. From there, you can select the Account Number you want to view. The contents of the tabs will change based on the Account Number as well as the tab visibility.
If you need help getting started, please open a My Synergent case for assistance.
Indexing Made Easier with Batch Templates
If your credit union has enabled Synergy Capture Client (storage fees may apply), you can set up Batch Templates. The Synergy Capture Client allows for multiple electronic or scanned documents to be processed in one or more batches. This feature is not available with ad-hoc filing.
The User Group you are assigned to must have Capture Configuration to access Batch Template Maintenance.

Click Add when in Batch Template Maintenance:
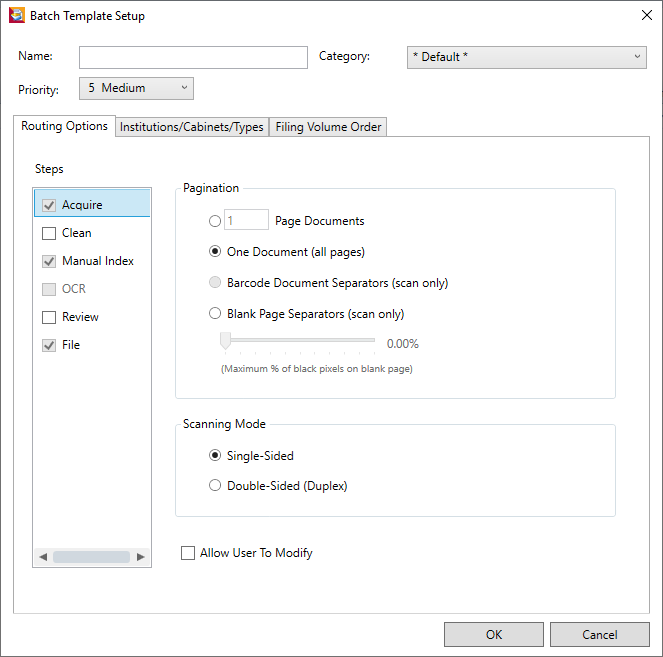
Routing Options
By default, the Acquire, Manual Index, and File steps are checked and cannot be unchecked. The Clean and Review steps are optional and dependent on the quality control procedures in place.
Choosing a Category will allow you to deploy Batch Templates to multiple people by assigning the Category to the User Groups that will need access to the Batch Templates.
The priority set will define how fast or how slow the document is imported based on how many documents are in the queue to import and what the set priorities are. The default is set to 5 Medium. You can set it as low as 1 which is the Highest priority and will import the fastest while setting the priority to 10 will cause the batch to sit and wait until all other batches are imported.
The Acquire step allows you to choose your pagination options when importing electronic or scanned documents.
- X Page Documents allows you to scan or import an image file and separate x number of pages into individual documents. This function is handy for uploading items, like Drive Up Receipts or Signature Cards, and turning them into a single page document.
- One Document (all pages) will make a single document out of all the pages imported from an image file or scanned item. When utilizing this feature, make sure to monitor the overall size of the document when using this option. When going above 1 or 2 MB, the retrieval time of that document is significantly impacted.
- Barcode Document Separators (scan only) are not currently available.
- Blank Page Separators (scan only) allow you to separate documents that have a variety of page lengths and requires a little bit of testing to get the maximum % of black pixels on blank page percentage correct. This can change from scanner to scanner and can be impact by how dirty a scanner may be if it is not cleaned often.
- Scanning Mode allows you to scan single-sided or double-sided (duplex) documents. Depending on how your scan profile is set for blank page identification, it may scan a blank page. The Scan Profile would enable you to test the % of black pixels to detect on a double-sided document. The scanner also would need to support doubled-sided scanning. This can be a time saver when thoroughly tested.
The File step allows you to set your Retention options. By default, these options are set to 30 and 365. We have found that setting these options to 7 and 14 make for a snappier response time when displaying multiple batches to the end user.
Institutions/Cabinets/Types
In this tab you would choose to reduce the amount of Cabinets and Doc Types available to the end user that will be indexing documents. For instance, if the scan operator plans to import a series of Signature Cards, the Cabinet should be limited to MEMBER RECORDS and the Types should be limited to SIGNATURE CARDS. This allows the Indexer to focus solely on the indexes. There is no need to select the Cabinet and Doc Type.
This feature can also be used for a Loan Package to limit the Cabinet to LOANS and whichever Doc Types that make up a Loan Package. That way the indexer has a limited number of Doc Types to go through when assigning a Doc Type.
Filing Volume Order
This tab determines where things should be filed and that is typically handled automatically in the background, so it is unnecessary to do anything in this tab.
Scanning Process
Whether you are importing electronic documents or scanning documents, you will want to first create a new batch by clicking on Import or Scan (additional licensing and fees apply for Scan). You will click on the dropdown for Batch Template and choose the Batch Template that makes the most sense for the documents being processed.
Split multipage image files by default is set to No, but if importing a TIFF or JPG, it will make for a faster response time when retrieving if this was set to Yes.
Delete files after import? This can be left at No as the Batch Template will dictate how long to keep the documents after import.
Take your time when setting up scanning. Run as many tests as necessary to find an optimal balance between Document resolution and file size. If they are above 1 to 2 MB per document (not batches), the response time when trying to retrieve that same document may be impacted to those users that will depend on accessing the document later.
Indexing Process
Choose the Cabinet and Type if necessary. Save time by entering the Account Number in the ACCT NO field and clicking the Smart Index button. ![]()
This fills in the NAME and TAX ID field. NOTE: We get extracts nightly from Episys on new accounts so typically Smart Indexes won’t find results for Accounts that are less than 24 hours old.
Fill in the remaining necessary indexes as needed.
If the documents belong to the same person you can pin the Indexes to all documents by clicking the Carry over Previous Document Indexes button, which can save a lot of time if there are a lot of documents associated with one member. Then you simply change the Cabinet and Doc Type per document, and you are done.
Learn More
Questions about any of these features? Are there other processes you want to learn quick tips for? Please send your question to your Account Relationship Manager. As always, there also are job aids for Synergy available to you any time within My Synergent.